
While I was just digging around Dreamhost’s panel, I stumbled across a new One Click Install I had not seen before: Trac.
Trac is, according to their site, an enhanced wiki and issue tracking system for software development projects. Nifty. The last time I had tried my hand with Trac, I think I almost lost my hands. But now, Dreamhost has made it super easy to get Trac, and Subversion (a Concurrent Version System, made super easy with TortoiseSVN) along with it.
Now, as excited as I was to get this ‘new’ thing running on my account, I realized I knew precious little about how to set it up beyond the One Click of the famed One Click Installation process. True, Trac was now installed in my account, but what next?
A long story short, I figured someone else might walk down the same path (and get lost like I did). So I basically screenshotted the path of least resistance to setting up Trac and Subversion on Dreamhost.
This procedure, assumes of course, that you have a Dreamhost account. If you don’t, then, well, you could enjoy this game I wrote in javascript, before you move on.
Step 1: Set up Subversion
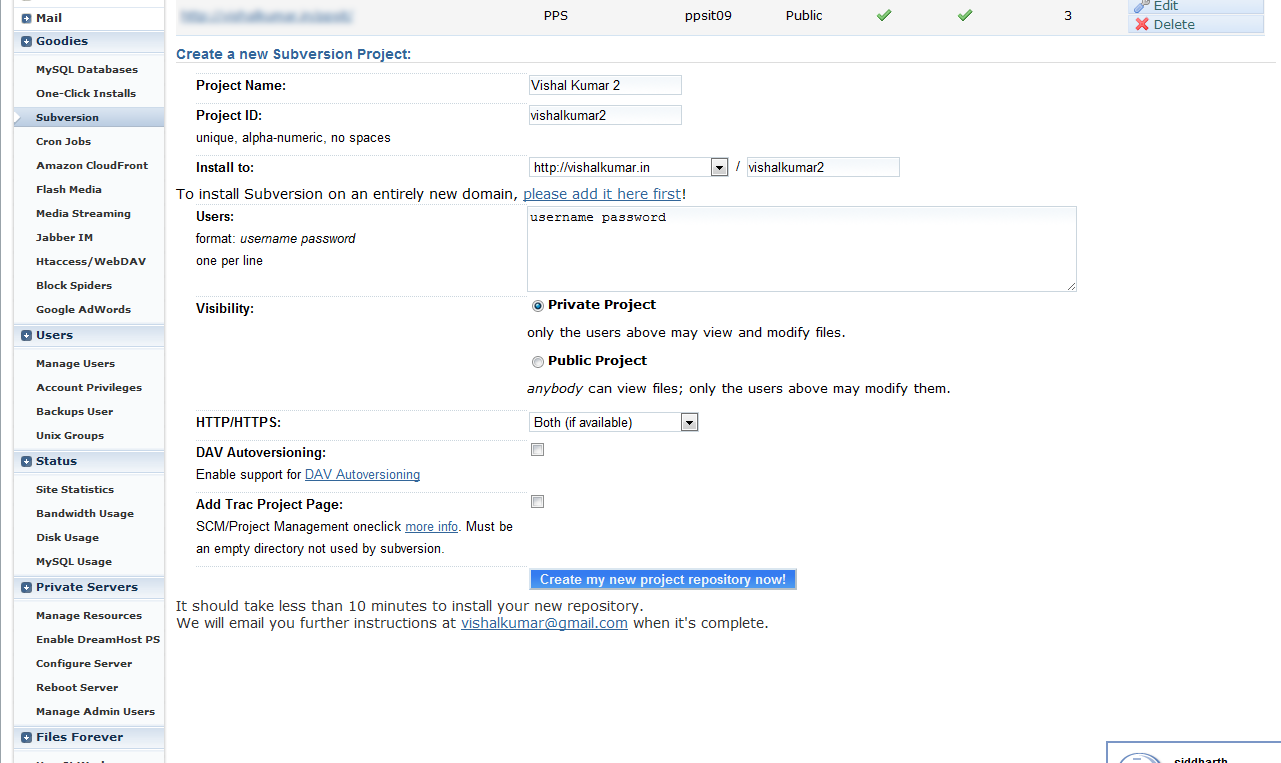
After you’ve logged into Dreamhost’s Panel, go to Subversion under Goodies. And fill out the form. The steps are fairly logical. You’ll get a delightful email from the Subversion creation Robot.
Step 2: Installing Trac
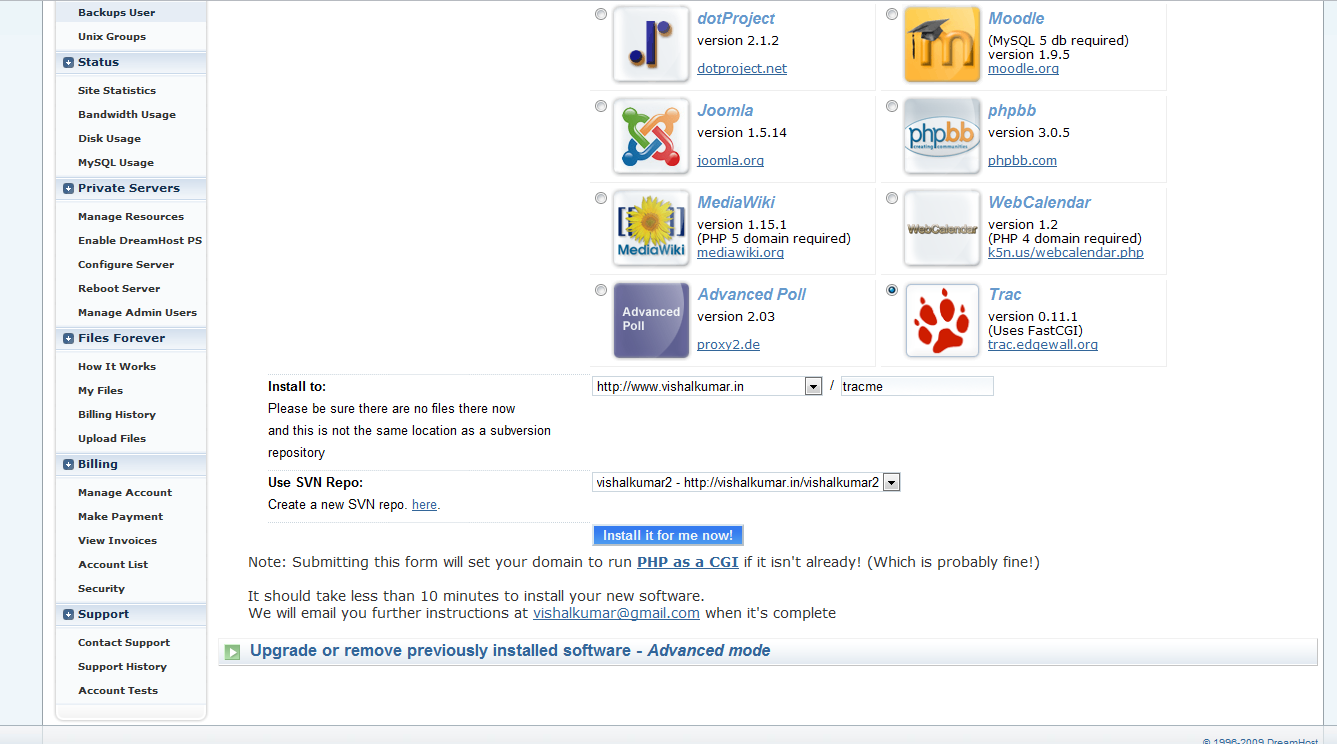
Make use of the One-Click Install feature in Dreamhost Panel, and go to second set of options to Advance Install. Select Trac, and type in an install directory. Make sure that this is empty. Select the SVN repository that you created above. Click install. You’ll (hopefully) get another delightful email.
Step 3:
After step 2, you should have a Trac and Subversion SVN up and running at their respective addresses. However, you still have to create an Admin user to get things rolling. (Unless having a fixed default installation is what you had in mind all along)
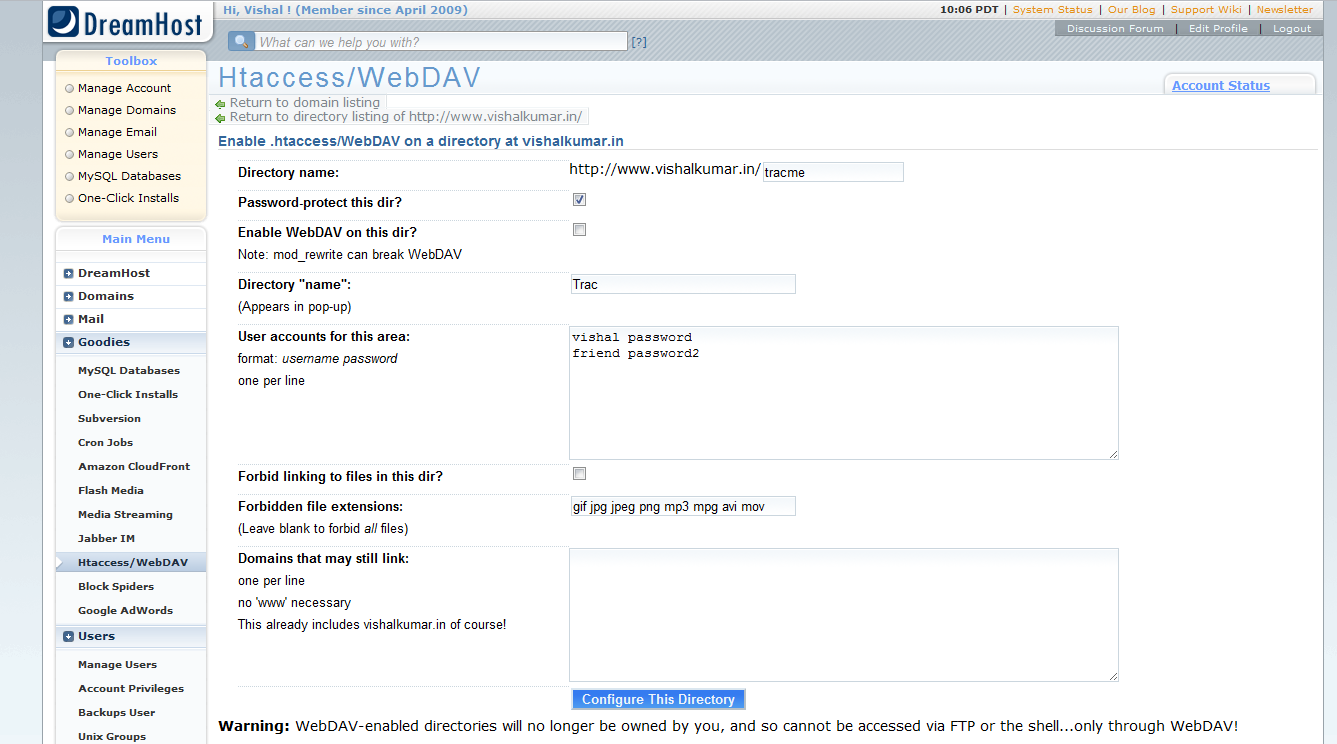
In Trac, the user authentication is tied into something called htaccess. This is something directly involved with Apache, the web server, and its settings can be access from the Goodies>Htaccess/WebDAV menu option.
Clicking on it will lead you to a list of the domains you have. Click on the one that you have installed Trac to. Then click on create a new directory.
Type in the same directory name as the Trac installation. And check the Password-protect this dir option. In the text area, type in some username – password combinations according the format given. You should have something like this:
Step 4:Getting Shell Access
Now, if you are like me, and haven’t used Dreamhost anything beyond FTP and some of the nifty features of the Panel, then welcome to the Shell Access for your host server. Basically, you’ll need to login into the server and run the ‘trac-admin’ program on the server and tell it to give you the Administrator rights, so that you can do those tasks through the web interface itself.
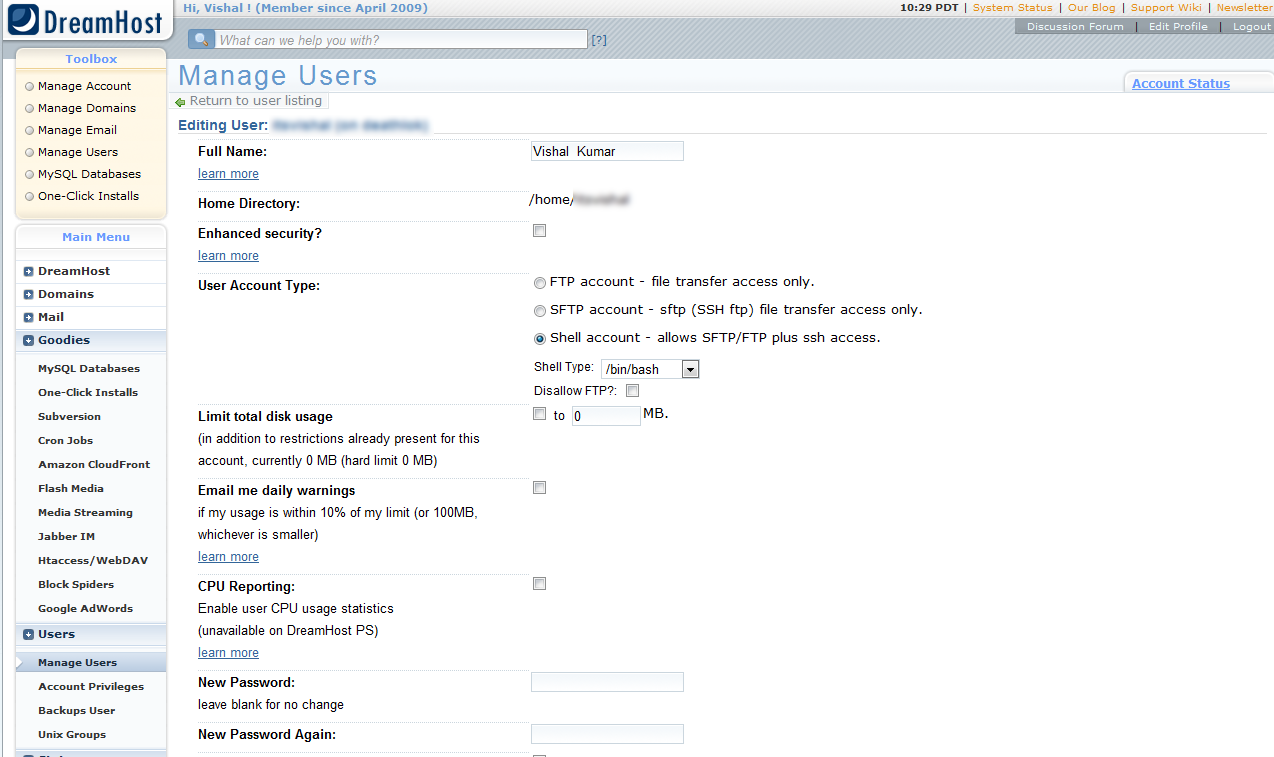
So, get yourself shell access by going into Manage Users on the toolbox, and then selecting a Shell Account (so that you can still ftp with that account).
Step 5: Login with PuTTY
Now you’ll actually need to log in into the server. For this you need a program that can SSH, like PuTTY. Get it here.
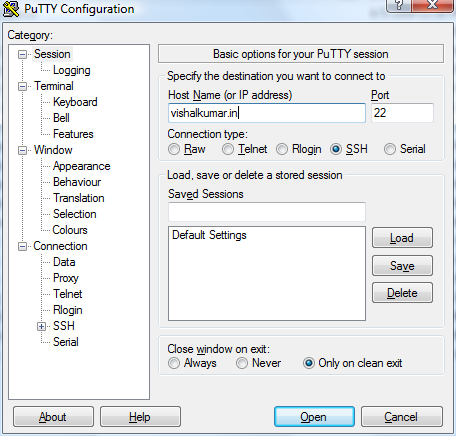
Upon pressing Open, you should be connected to the host, and you’ll get a username/password request. This are the same details for the account you just changed the type to Shell for.
Step 5: Giving Administrator Rights
Now, you’ll need to give yourself administrator rights. The way this is done is by calling on the ‘trac-admin’ program to give so-and-so user the ‘TRAC_ADMIN’ permission right. Once you have that, you needn’t return to this dark place, and can use the web interface for most of the work that you require. Right, go ahead, type something like the following then:
trac-admin www.vishalkumar.in/tracme permission add vishal TRAC_ADMIN
Replace the www.vishalkumar.in/tracme with the exact address you asked the One Click Installer to install Trac into. Replace vishal with your username.
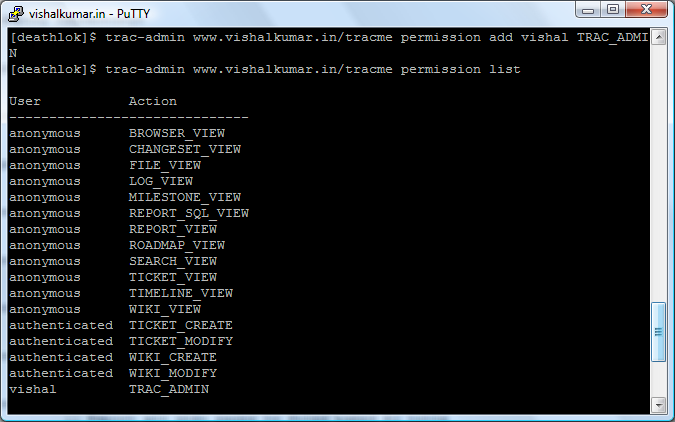
Running the permission list command will show the current list of permissions.
Step 6: You’re Done!
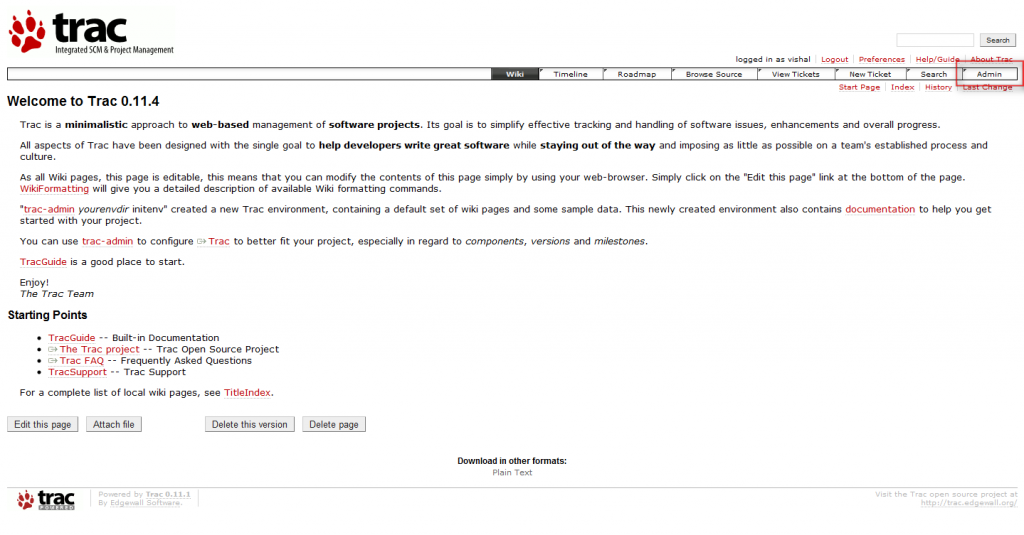
Well, if you’ve reached this far, then you’ve managed to successfully installed Trac and Subversion, and created an Administrator for it, on Dreamhost. If you browse to your Trac site, you’ll be requested for a username and password (the one you just created in htaccess). You should see something like
8 replies on “How to set up Trac and Subversion SVN on Dreamhost”
what will you be making?
Thanks for this, it was useful!
[…] I didn’t do this by myself. The first part of this document is based quite heavily on http://www.vishalkumar.in/2009/09/how-to-set-up-trac-and-subversion-svn-on-dreamhost/ […]
the question is …WHAT are YOU making… he's outlining how to get it setup, as its a pain. A REAL PAIN on DH.
They dont walk thru how to get the admin accounts setup ok.
could you walk thru the svn setup ?? Im having issues accessing my svn servers.
svn. <subdomain> is good, BUT…. has to point to a SVN repo, not HTML.
Hmm… after the DH setup, the rest of it works fine for multiple developers on a single project.
I current have a little set up with XAMPP, doing a little PHP app. I use TortoiseSVN to keep the same folder synchronized (except the database settings file, which I keep as Ignore update, for obvious reasons).
You'd just take the SVN link and when you right click on a folder to synchronize, you can drop in the link, username and password (which is set in DH's panel). TortoiseSVN is pretty well documented, thankfully.
Many Thx 4 this post !!!!
great writeup. I was having problems with step 5 until your post. thank you very much.
long term disability lawyer you walk thru the svn setup ?? Im having issues accessing my svn servers.